Another in the series “Things I didn’t learn in the library”
By Roger Kelly
We’ve all been there. One or more round, pale nodules protrude from liver, or spleen, or lymph node… or indeed, from any tissue. You pause during the autopsy and consider the options. Something has been focally added to the tissue, so it’s unlikely to be a degenerative process. And a developmental disorder seems intuitively unlikely. So that leaves either inflammation, or neoplasia. You slice open one of the nodules. If it consists of a tough capsule surrounding a purulent or caseous centre, you feel fairly confident that it’s subacute or chronic inflammation. But what if it’s fairly uniformly fleshy across its cut surface, with a few foci of necrosis?
Well, we could just take appropriate samples for histology and microbiology and wait for the results. That’s certainly easier than interrupting the dissection to make cytological preparations, but by neglecting to do this, you are missing an educational opportunity of great value to any residents or students you may have in the PM room with you. You may also miss an early diagnosis of an important zoonosis, with health implications for those exposed to the carcass.
My post-graduate pathology training began in Ken Jubb’s department in Melbourne. He was quite uninterested in cytology; his attitude seemed to be: “Why look at isolated cells when you’re going to be looking at what they’re doing in tissue sections?” But later, when I had a couple of graduate students who asked for cytology training, I realised that, as a histopathologist, I had a golden opportunity to learn with them, by preparing cytological preparations from specimens that had been presented for histological diagnosis. We would end up with a histological diagnosis which we could compare with our cytological interpretation, and the cytological learning curve was steep.
I made my first trainee use the May-Grunwald-Giemsa stain, since that was what the standard texts recommended. Later, of course, we found – like everyone else – that DiffQuik is just as good if used properly. But we also tried making temporary “wet preps”: buffered 0.1% toluidine blue (or new methylene blue) dropped onto rapidly air-dried, unfixed smears and cover-slipped wet; the excess stain
being blotted from the edge before going straight to the microscope. Even quicker than the Diff-Quik. The great advantage of the wet prep was that you very smartly knew whether or not your sample was adequate; if it wasn’t, you could go straight back and resample.
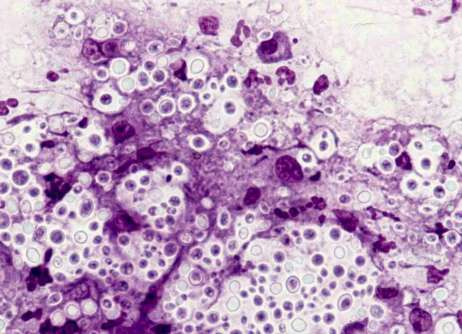
We soon realised that the nuclear detail in the wet preparation was often superior to that in even the best Giemsa-stained smears; it was reminiscent of that seen in Papanicolau preparations. Mast cell granules were even more strongly stained than in the Giemsas, and there were other bonuses, such as the dramatic demonstration of cryptococcal capsules.
Of course, the downsides of the wet prep include the fact that, being unfixed, pathogens in the smear might be dangerous to the observer, and it is temporary and is useless after a few hours. And, with time, the buffered stain grows microbes and throws a precipitate. But make it up in a 10ml Luer syringe fitted with a Millipore filter, and you will have freshly-filtered stain whenever you need it.
A serious disincentive for the practice of rapid cytological examination during the autopsy is the need to easily access a decently-maintained microscope, if not in the PM room itself, then in a nearby annexe, entry to which that doesn’t necessitate changing. In the best of all worlds, the prosector would whistle up a skilled technical assistant who would run in with 2 clean slides and a hair-drier. The pathologist would deposit a suitable sample on a slide; the technician would gently push the second slide onto the sample, draw the slides apart, immediately dry the smears with the hairdryer, make a wet prep with one and put the other into Diff-Quik fixative. The pathologist would then be called to the microscope (disposable plastic bags on the controls, so glove removal not necessary) and become better informed about what disease processes are involved. This would influence decisions about subsequent specimen sampling and laboratory submissions…
OK, this a bit of a dream. In the real world the technician is probably having morning tea, or it’s the weekend and you’re working alone. But whenever possible, especially when preparing to open a freshly-killed animal, try to at least set out some clean slides and a hair-dryer as close to the action as you can. Now let’s say you are opening a freshly killed cat and find some large sub-lumbar lymph nodes; the other nodes look normal. It might be a case of localised lymphoma, or it might be lymphadenitis. A quick look at a wet prep should enable you to distinguish between inflammatory cells and malignant lymphocytes. If the latter, you probably wouldn’t bother about submitting a node to the bacto lab.
It’s all a lot easier with biopsies, provided you can train the surgeons. This isn’t easy, I know, but you have to get them to call you when they have just cut something out, and before they’ve put it in formalin. You get the sample while it’s still warm and you can slice it open and scrape a blade across the cut surface to give you something to smear. Or you can practice your fine-needle aspiration technique, especially if it’s a large sample. I know of clinicians, in clinics remote from pathology labs, who will make smears from fresh biopsies before putting them into fixative and sending them away. These folk have thus trained themselves in cytology, since they can compare their cyto interpretation with subsequent histo reports, just as I did.
The use of the hair-dryer is essential, because speed of drying of smears is critical, whether they are for wet prep or Giemsa/Diff-Quik. The osmotic shrivelling of cells during slow drying is horrible. A drier may not be needed in the desert in high summer, but PM rooms are wet and the air is humid.
The wet prep might not even need staining. A dog with acute renal failure was presented for autopsy in early winter when I was working at Cornell. Grossly, the kidneys were slightly enlarged, pale and wet on section. We all expected this to be a case of oxalate nephrosis, since antifreeze poisoning of dogs is common at that time of year, but when I asked the residents how we could confirm the diagnosis before “show-and-tell” later that afternoon, they were puzzled. So I gently scraped a freshly-cut surface of kidney and put a drop of the juice on a slide, followed by a cover-slip. With no stain, and the iris diaphragm choked right down (“poor man’s phase contrast”), the oxalate crystals were spectacular.
Another trick concerning oxalate crystals (or any refractile material) in histo sections is to place your hand close to the light source and block half the light, and the crystals will jump out at you. A lot quicker than setting up phase contrast.